After creating the blog, using Hugo, S3 and Codebuild. The next natural step was to access the site using a custom domain. Using AWS there is a very practical way to achieve this. The process involves Route 53, Certificate Manager and CloudFront. This post is based on Felix Yu’s video, where he explains this process very well documented. I will show how each service helps to get the custom domain and some key notes on the process.

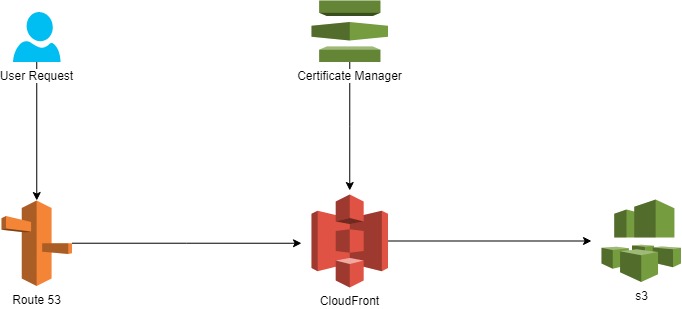
Diagram for custom domain in AWS
Route 53 is a domain name system where you can manage your domains and keep track of them. There is also CloudFront, which is a content delivery network service. It delivers content to users with very little latency. At the same time, AWS Certificate Manager helps to deploy a certificate to prevent hacking. Finally, CloudFront will request the data from the S3 bucket, where the website data is located.
An interesting feature of CloudFront is its cache. Where on the first time you request the data it goes to the bucket, but on the second request, you will get the data from a cache edge location. With this it is faster and cheaper.
Summary of steps:
- Register a domain: Completed using Route 53 service. The price range is between 11 and 25 dollars.
- Created a hosted zone: Also in the Route 53 service we go to the hosted zones option and we use the domain that just create and select the public hosted zone, because the private is used within an Amazon VPC. Note: An important step is to make sure that NS values values matches with the values in the registered domain.
- Create the Index file in the s3 bucket. This step is skipped because we created our page in the previous post. Note: Remember to not block all public access in your bucket and to review your bucket policies. Also in properties enable the option of static website hosting and specify the home page of the blog, usually index.html
- Enabling the https request: AWS has the Certificate Manager service. Just request a public certificate by using your domain. Be sure to create record in Route 53.
- Create a distribution in CloudFront: Pick the webpage type option. Then copy our bucket website endpoint and put it in the Origin Domain Name. Also select the option Redirect HTTP to HTTPS in the Viewer Protocol Policy. In CNAMEs we use our domain (really important). Finally we choose our custom SSL Certificate created in step 4.
- Finally, in Route 53 we create a new record, selecting simple routing option. Then define the record, where you choose the CloudFront distribution for the Value/traffic option. This record will point our domain into the CloudFront distribution.
When making updates to your website, such as adding a new post, it’s important to ensure that your cache control settings are properly configured. This is particularly important if you’re using AWS CloudFront, as it may not automatically update the files in your S3 bucket. To ensure that your changes are immediately visible, you can set your max-age parameter to 0 or manually invalidate your files in CloudFront